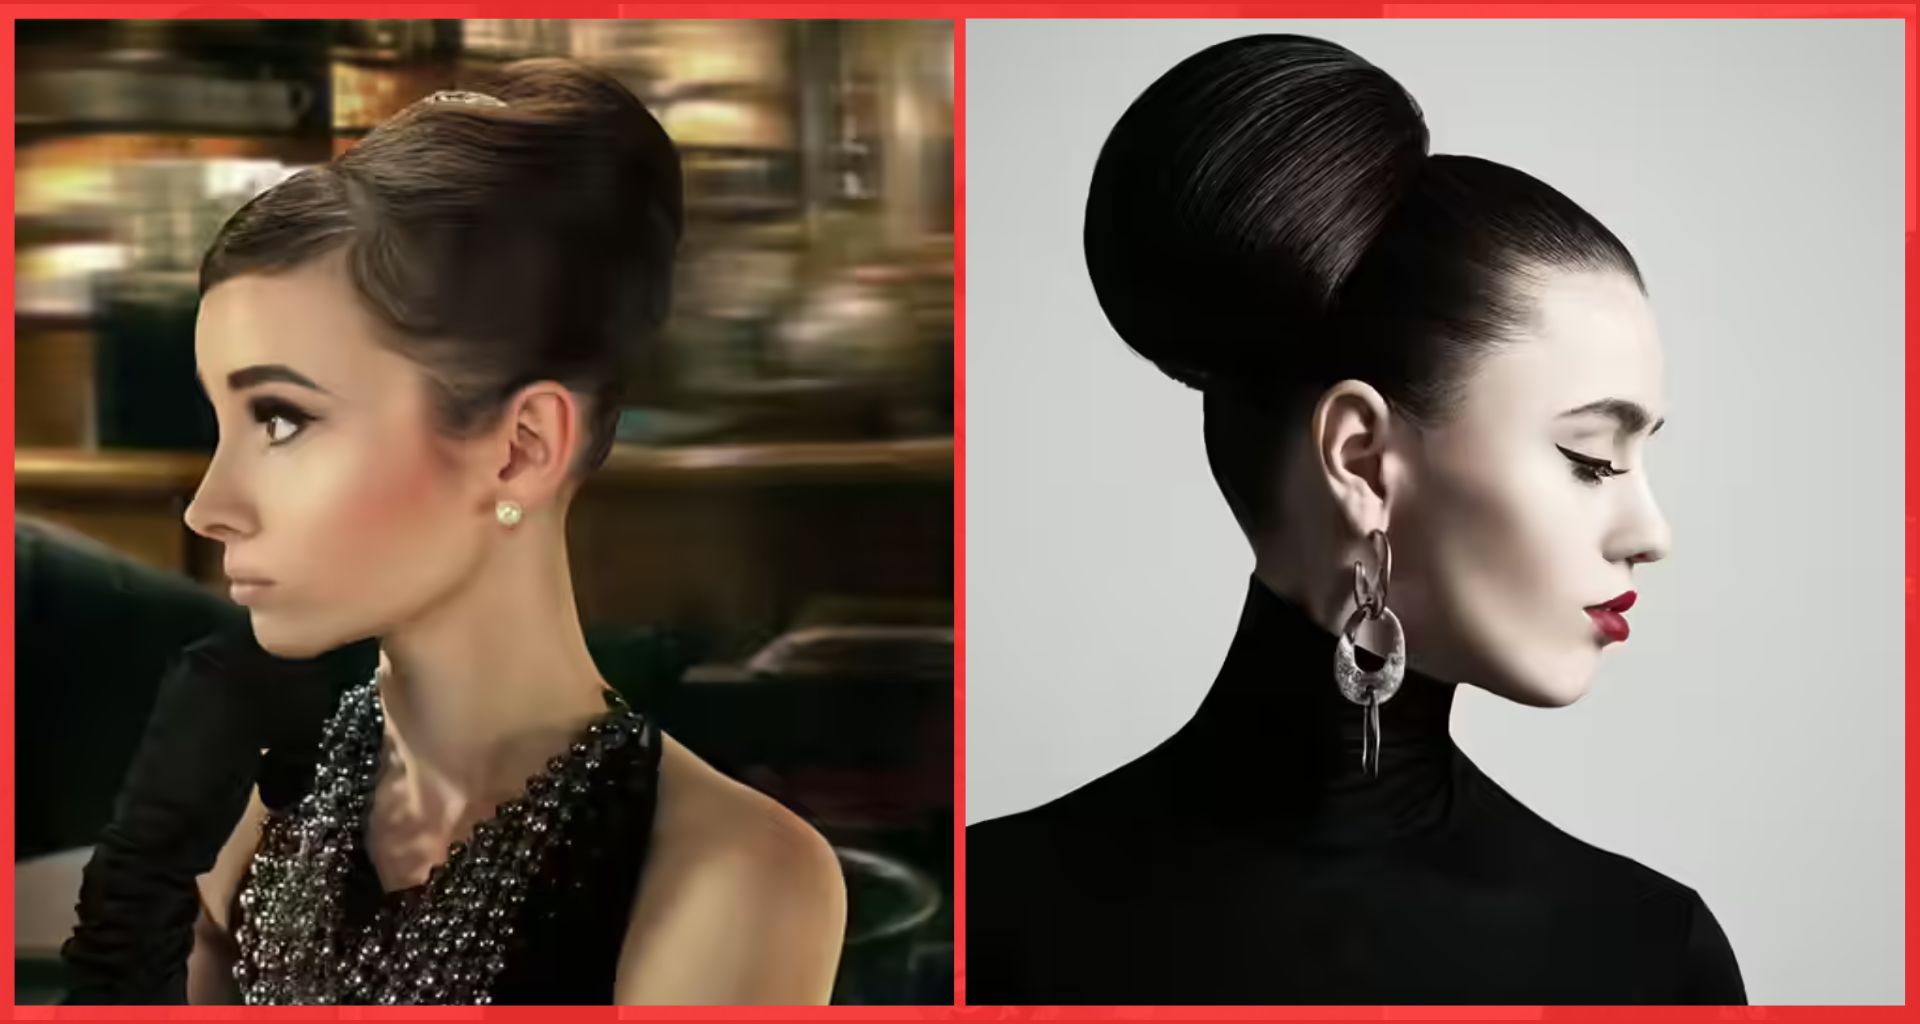
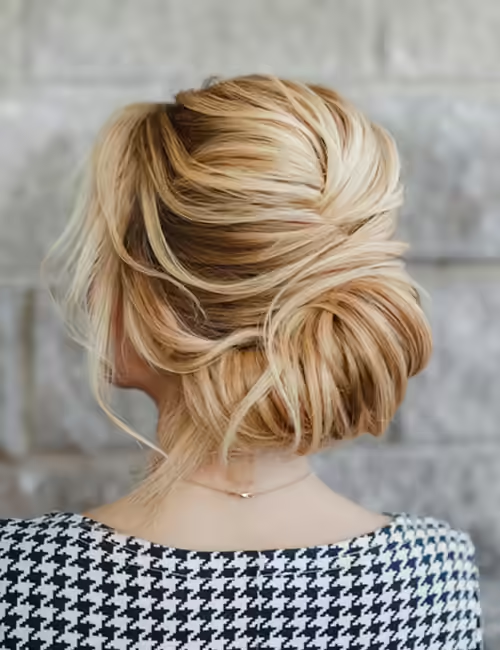
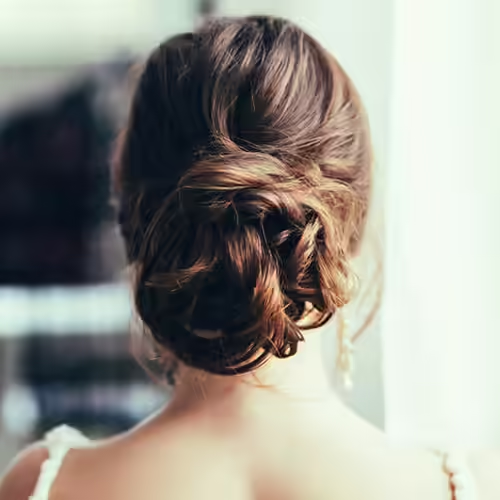
Updos are a timeless and versatile hairstyle option for women with long hair, offering both elegance and practicality. Whether you’re attending a formal event, heading to the office, or simply looking to switch up your everyday look, updos can elevate your style effortlessly. To help you master the art of updos at home, we’ve compiled a list of 13 stunning DIY updo hairstyles for long hair. These styles are not only simple to achieve but also adaptable to suit any occasion or face shape.
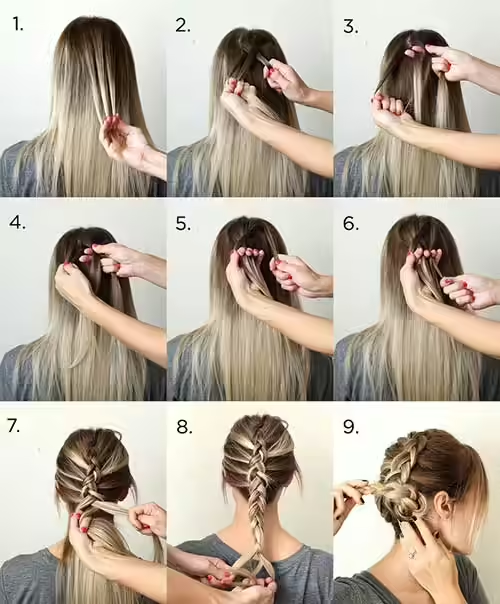
1. Fishtail Bun
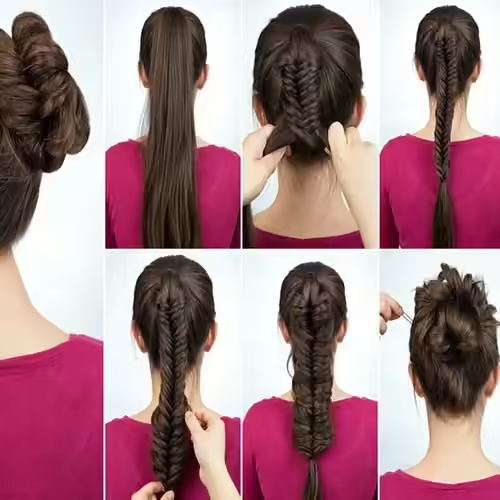
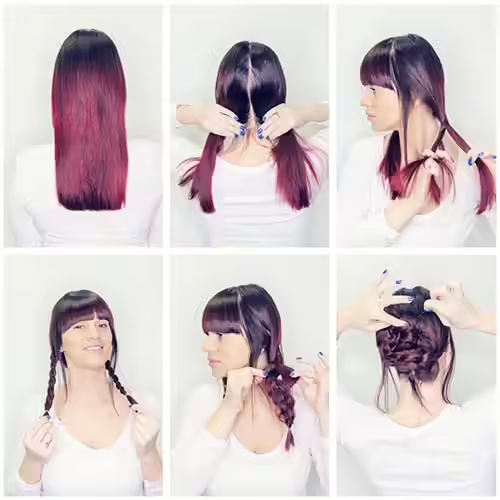
The fishtail bun is a sophisticated and eye-catching updo that’s perfect for formal events like weddings, parties, or evening gatherings. This style combines the intricate beauty of a fishtail braid with the classic charm of a bun.
What You’ll Need:
- Hairbrush
- Elastic hair bands
- Hairpins
- Hairspray
How to Achieve It:
- Begin by brushing your hair thoroughly to remove any tangles.
- Gather your hair into a high ponytail and secure it with an elastic band.
- Start weaving a fishtail braid all the way to the ends, securing it with another elastic band.
- Gently pull apart sections of the braid to add volume and texture.
- Twist the braided ponytail around the base to form a bun, securing it with hairpins.
- Finish with a spritz of hairspray to hold the style in place.
2. Retro Chignon Bun
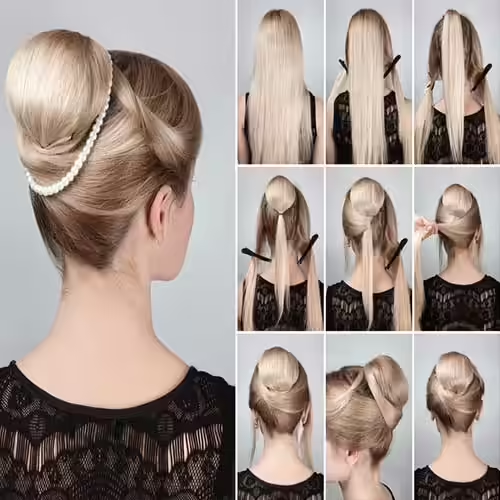
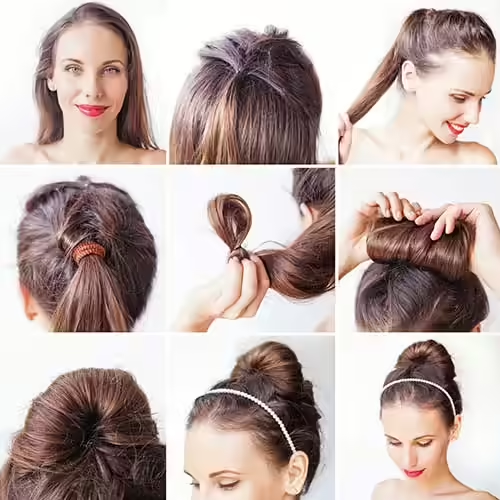
The retro chignon bun is a timeless and elegant hairstyle that suits all face shapes and occasions. This version adds a modern twist to the classic French bun.
What You’ll Need:
- Hairbrush
- U-pins
- Elastic hair bands
- Claw hair clips
- Donut bun
- Hair accessories (e.g., pearls or ribbons)
How to Achieve It:
- Brush your hair to eliminate knots, then divide it into three sections: two side sections and one middle section. Secure the side sections with claw clips.
- Tie the middle section into a high ponytail and place a donut bun at its base.
- Wrap the ponytail hair around the donut bun to create a puffed look, securing it with an elastic band.
- Take one side section, wrap it around the bun, and secure with U-pins. Repeat on the other side.
- Use the front layer of hair to create a gentle twist, wrapping it around the bun and tucking the ends with pins.
- Accessorize with a pearl string or decorative hairpiece for added flair.
3. Lace Braid Updo
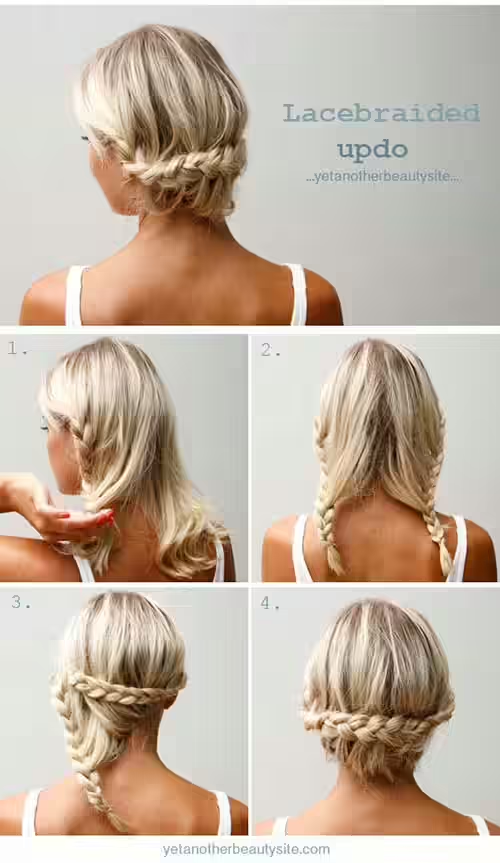
The lace braid updo is a romantic and versatile style that works beautifully on all face shapes. Its loose, flowing design draws attention to your eyes and mouth while softening facial features.
What You’ll Need:
- Hairpins
- Elastic bands
- Comb
How to Achieve It:
- Divide your hair into two halves, from the center of your forehead to the nape of your neck. Allow the front sections to frame your face.
- Begin braiding one section, starting at the ear and extending down to the neck. As you braid, incorporate additional strands of hair with each stitch. Keep the braid slightly loose for a natural effect.
- Secure the end with an elastic band and repeat the process on the other side.
- Cross the braids over each other, pinning them behind the opposite ears to create a cascading effect.
- For a polished finish, use hairspray to tidy up the nape if desired.
4. Dutch Braid Bun
The Dutch braid bun is a chic and structured updo that adds dimension and texture to your look. Also known as an inverted French braid, this style is ideal for oval faces but can be adapted for broader face shapes by leaving a few strands loose.
What You’ll Need:
- Elastic bands
- Hairpins
- Comb
How to Achieve It:
- Comb your hair to remove tangles and divide a small section at the crown into three equal parts.
- Begin a Dutch braid by crossing the middle section over the side sections. After two stitches, incorporate more hair into the side sections with each stitch.
- Continue braiding until you reach the ends, securing with an elastic band.
- Roll the bottom half of the braid into a bun—opt for a flat bun if you have medium-length hair or a fuller bun for longer hair. Secure with pins.
5. Beehive Bun

The beehive bun is a glamorous and voluminous updo that’s perfect for formal events or nights out. This style combines height and structure with a touch of vintage charm.
What You’ll Need:
- Elastic bands
- Hairpins
- Comb
How to Achieve It:
- Part your hair on one side and comb it smooth.
- Gather all your hair to one side, holding it in place with pins.
- Create a bouffant at the crown by pushing the hair upward and securing it with pins.
- Twist the remaining hair into a French twist and pin it in place.
- Tuck the side sections under the twist and secure them with pins. Optional: Leave a few strands loose to frame your face.
6. French Twist Updo
The French twist is a classic updo that flatters all face shapes. Adding bangs—whether side-swept or feathered—can enhance the overall look.
What You’ll Need:
- Elastic bands
- Hairpins
How to Achieve It:
- Detangle your hair and apply dry shampoo for added volume if needed.
- Gather your hair at the center of your head and start twisting it inward toward your scalp.
- Once fully twisted, pin the bun securely in place.
- Allow a few strands to fall loose for a boho-inspired vibe.
7. Puffy Ponytail
The puffy ponytail is a quick and stylish option for busy days. It’s especially flattering on day-two or day-three hair, as the texture adds extra allure.
What You’ll Need:
- Elastic bands
- Hairpins
- Rat-tail comb
How to Achieve It:
- Comb your hair and spritz with hairspray or dry shampoo for texture.
- Backcomb the crown section and pin it halfway up the back of your head to create a half ponytail.
- Curl the ends of your hair for a polished finish.
- Gather your hair into a high ponytail, allowing the half ponytail to form a bouffant. Secure with an elastic band and adjust the volume as needed.
8. Messy Bun
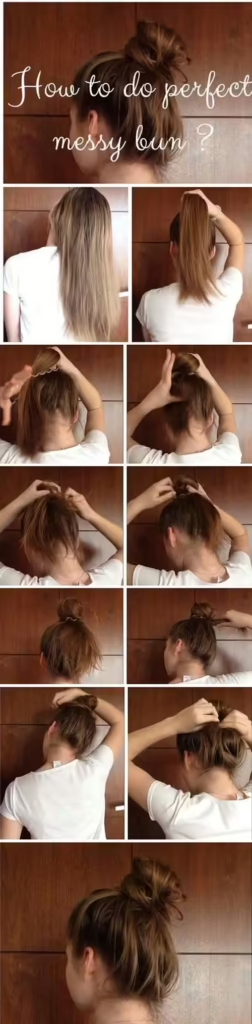
The messy bun is a casual yet chic updo that works for almost any occasion. Its effortless appearance makes it a favorite among women with long hair.
What You’ll Need:
- Elastic bands
- Hairpins
How to Achieve It:
- Tie your hair into a high ponytail.
- On the final loop of the elastic band, pull your hair only halfway through to form a bun.
- Twist the loose ends and wrap them around the base of the bun, securing with pins.
- For added texture, gently pull at the crown to create volume.
9. Braided Bun
The braided bun is a bohemian-inspired style that looks stunning on oval faces. Pair it with blunt bangs for a balanced look.
What You’ll Need:
- Elastic bands
- Hairpins
How to Achieve It:
- Detangle your hair and split it into two sections.
- Braid each section and pancake the braids for a loose, voluminous effect.
- Wrap the braids around each other to form a bun and secure with pins.
10. Korean Bun
The Korean bun is a unique and elegant updo that works for all face shapes. Adding curled side strands enhances its beauty.
What You’ll Need:
- Elastic bands
- Hairpins
- Rat-tail comb
- Hairspray
How to Achieve It:
- Start with a French braid, weaving about five stitches before tying it off.
- Gather all your hair into a ponytail.
- Wrap the ponytail upward and around itself to form a bun, securing with an elastic band.
- Pin the hair in place to create a downward French twist effect.
11. Elegant Bun
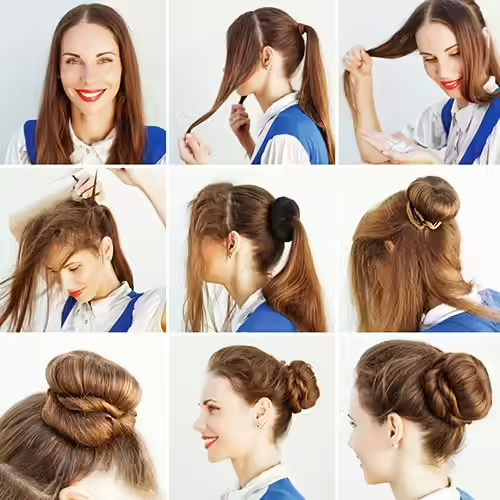
This polished updo is perfect for professional settings. It combines the structure of a donut bun with the softness of twists.
What You’ll Need:
- Elastic bands
- Hairpins
- Donut bun band
How to Achieve It:
- Divide your hair into two sections: one for the bun and one for styling.
- Insert the donut bun band at the base of the ponytail, arranging the hair around it.
- Secure the bun with an elastic band and twist the remaining hair around the base.
- Pin the top section neatly around the bun for a sleek finish.
12. Back Braided Bun
The back braided bun is a playful and creative updo that allows for customization with accessories.
What You’ll Need:
- Rat-tail comb
- Hairpins
- Elastic bands
- Hairspray
How to Achieve It:
- Divide your hair into two sections and tie each into a ponytail.
- Braid each ponytail and roll them into buns, pinning them in place.
- Layer the braids for a textured look and finish with hairspray.
13. Twisted Bun
The twisted bun exudes sophistication and elegance, making it a versatile choice for any occasion.
What You’ll Need:
- Detangling comb
- Elastic bands
- Hairpins
- Donut bun band
How to Achieve It:
- Detangle your hair and divide it into two sections.
- Backcomb the top section and insert the donut bun band at the base of the ponytail.
- Arrange the hair around the donut bun and twist the ends around the base. Secure everything with pins.
Styling Tips for Long-Lasting Updos
To ensure your updo stays intact throughout the day, consider these tips:
- Use a strong-hold hairspray to lock in your style.
- Incorporate texturizing products like dry shampoo for added grip.
- Secure your updo with plenty of pins, especially if you have thick or heavy hair.
- Practice makes perfect—experiment with different styles to find what works best for you!
With these step-by-step guides, you can confidently create stunning updos at home and embrace the versatility of long hair.
